March 31, 2004
Needle Butts
Okay, what would YOU call them, huh?
It's the end pieces on knitting needles, usually -but not always- made from polymer clay. I've also seen buttons, glass beads, and acorn caps. They're there to stop your precious knitting from falling off the not-working end of the needles. Kind of what may stop your pants from falling down (if you're built right wink, wink).
Well, whatever you want to call them I've made a few for my new needles. (And no, none look like rear ends.)

Using polymer clay is pretty easy and rewarding. The two most difficult things are first trying to decide what to make, and then stopping. I've jotted down some notes from my attempts with the clay, but this stuff is nearly limitless.
Tools needed:
- polymer clay (brand names: Fimo®, Scupley®, and Cernit®) *note: be sure to get firm-after-baking products
- wax paper (or a clean, non-stick surface to work on)
- oven
- aluminum foil
- glue (to secure the clay ends after baking, if needed)
- and I find toothpicks helpful for a myriad of things
There are a few tips to keep in mind when working with polymer clay:
- Polymer clay comes in a great variety of colors, styles and effects. For this project, you'll want to stick with a hardening clay.
- Try to stay with the same brand/product, or with similar baking times and temps.
- The colors will stain whatever it comes into contact with, so be certain to protect what you like.
- If the clay is dry out of the package, simply wet with a little water (or damp paper towel) until it's pliable. It also "loosens up" after working it in your hands for a while.
- Can't quite find the color you want, or don't want to buy every possible tone and shade? Much like paint, simply mix your clays to create different colors.
- Everything leaves an impression. For fingerprintless masterpieces, use disposable gloves or wax paper.
- Keep your eye on the size. Too heavy ends on the needles will make them unusable. Keep the size minimal and light.
- Use aluminum foil to protect your baking sheet and to prop up your creations in the oven.
- Read the products directions and warnings. I'm not your mom.
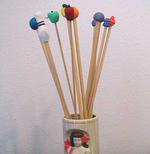
Other than those tidbits, enjoy yourself and be creative. Here are some pix of the 'needle butts' that Bonez and I made:

I can't take the credit for the idea, but only for the conception. A delicious, red apple and a yummy, green... eww, there's a worm in my apple! [hehehe] Yin and yang, my good friend. Yin and yang. The yarn is gray Merinos Dodici.

These were Bonez's contribution. Bowling pins *and* needles! Oh, that Matt. The yarn is a great wow 'em red and black eyelash called The Baroness. Very punk.

Inspired by my apples, but wanting something different (ergo, oranges); I went with a citrus theme. I used a toothpick to give the lemon and orange texture. Now if only they made scratch'n'sniff clay. Unfortunately, the yarn's true color didn't show up, but I promise you that it's a gorgeous, chocolaty-brown with brightly colored tuffs and called Blossom, from Trendsetter Yarns.
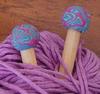
This is my hippie contribution. (Whenever crafting, I find it necessary to give homage to the hippies that have gone before us. um, yeah) It was really me playing with colors and design. Posed with Sirenetta, a soft cotton/acrylic blend, in what I call lavender-berry.

And finally, my mismatched, two-toned spirals. No idea what motivated me (or didn't), but I'm happy with the silliness. They're shown with a pound (!) of golden-tan 100% wool purchased on eBay.
March 30, 2004
Knitting Stix
If you don't have two sticks to rub together to buy two sticks, er... knitting needles, you can simply and affordably make two sticks (respectively). Quite honestly, knitting needles aren't rocket science. Sure, fancier and pricier wood makes for fancier/pricier sticks. But for pure knitting goodness, you can easily make a pair (or five) from craft wood dowels.
This is an easy afternoon craft, with minimal mess and instant rewards. You can jazz it up a notch by making you're own needle ends from polymer clay, or keep it simple and glue a button or whatnot on the end of your needles.
So have some fun, be creative, and read more.
Ingredients for making knitting needles:
- 36" length wood dowel(s) *
- hack saw
- range of sanding paper (I used hobby sanding films, which worked great since they can bend and flex without cracking, and they're reusable)
- wax paper
- measuring tape
- pencil sharpener(s)
* I used a range of dowel sizes to make a variety of needles. Here's how the fractional inches worked out as needle sized after sanding:
- 3/8" = 9mm/US #13
- 5/16" = 8mm/US #11
- 1/4" = 6mm/US #10
- 3/16" = 4½mm/US #7
- 1/8" = 3¼mm/US #3
Please use common sense and normal safety precautions when working sharp objects.
- Measure, mark and cut the dowel(s). I cut mine into 14" lengths, which are the same size as my purchased needles. If desired, I'm sure you could get four dpns (double-pointed needles) from one dowel.
- Using a pencil sharpener, sharpen one end of the cut dowels. I ended up using three different sharpeners for this job. The 1/8" dowels fit into a makeup pencil sharpener (good use for a rarely used item - imho); the three middle range sizes worked well in Bonez's Coke® can sharpener (and it's battery operated, bonus for laziness); and finally, the larger dowels fit into our school-style rotary sharpener (ah, the memories). Actually, all of them would've worked in this last sharpener, but it was lost to me until Matty came home and could retrieve it from who-the-hell-knows-where.
- Starting with a coarse sandpaper, sand all of the dowel length, but focus on the pointed end. You want to round this point down so it won't hurt when you knit. Your sanding motion should follow the length as well as around the circumference of the dowels,
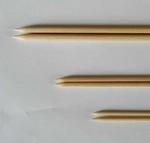 being careful not to make a lopsided needle.
 - Move on to the next, medium-coarse paper; sanding the dowels well. Continue using less-coarse grades of paper until the fine grit. You could probably do it justice with three varying grits, but I used four from my pack of five. Once you reach the fine sanding paper, the needles should be smooth and you shouldn't be able to feel any flaws in the wood.
- Tear off a piece of wax paper and rub down the needles, much like the sanding motions. As the wax paper heats up with the friction, the wax will transfer onto the wood. (Pretty kewl, huh?) You can use both sides of the wax paper - don't mind the wrinkles and don't stab your hand.
 You can also use this trick to finesse up older wooden needles that could use a bit of smoothing.

My biggest hint while making these wondrous inventions? Careful who you let watch you make them! The motion of both sanding and waxing is reminiscent of, well... I just recommend that you do this in the privacy of your own home.
March 28, 2004
Archos MP3 Recorder
20 gigs of music, a text viewer, games, video player and more. Be honest, now you want one, too.
I am a geek, and I like geek things and I like to listen to music (prolly geek music). I have headphones on most of the time at work. Nanc and I have been on the lookout for new mp3 players for a while now and the Archos Jukebox seems to be a pretty good place to start.
Also, since nanc has been updating the site more than me, there is a need for more testosterone-fueled articles. Matty = testosterone -- heh...
I will start off by being honest. Would I like an ipod? yes. They are uber-pretty and lets face it - the commercials are dang sexy. Though I have never played with one, the user interface is supposed to be quite nice.
The purchase decision was made on several levels. A 15GB ipod costs $300. The 20GB Jukebox costs (after rebate) $124.88 on Amazon. More gigs, half the cost, and a operating system to hack around with. hmm...
So far, I've only purchased one, but if it works out nicely, we will buy another.
20 Gigabytes is a whole lotta space. (audience: how much space is it?) Supposedly, it's enough space to record 300 hours of mp3s or approximately 244 74 minute music cds. Of course your mileage may vary if you have several copies of the Frampton Comes Alive double album. (Was that even on cd??? if so, why??) ...but I digress...I should be able to load every song from every cd I own, and still have room left.
So, I am going to document the process of playing with this mp3 player and using the open source software (rockbox), and hopefully tweak it here and there. I think that this will work well...
Stay tuned and I will update this page with more info and pix.

So here's the new stuff.
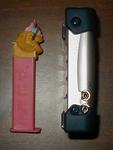
Let's start off with some pix, so that you can see what we're talking about. The official name is "Archos MP3 Jukebox Recorder Version 2" (Electric Boogaloo). As you can see, the Archos is approximately the same height and depth as a Zoe PEZ dispenser. No, I didn't have a ruler handy, but thanks for askin'.
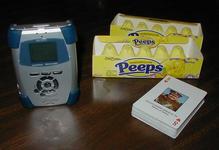
Weight-wise, I was again stumped, as I don't have access to a small scale. So, I have judged the weight of the mp3 player to be approximately that of two packages of Peeps and a deck of Iraqi most-wanted playing cards.
overview
The unit comes with several accessories, most of which are useless/ugly. Leading the ugly group is a blue neoprene carrying case with convenient belt loop. If this case could talk, it would say "please beat me up, as I am a loser. Thank you." Heading up the useless group are the fancy foldable headphones. The good news is that I didn't buy the player for the accessories. But really, if you buy this, get new headphones quickly. Also included are usb-usbmini (to connect to your PC) and rca to 1/8" jack (to connect to other audio equipment).
how does it work?
The player is essentially a hard drive in a cute box. It works like a hard drive. When you plug it into your PC via the usb cable, the player is recognized as a regular hard drive. Copy and paste, drag and drop, or use any other favorite method to move and organize music. When done, undock the drive and go listen to some Sly and the Family Stone.
installing rockbox
There are two different ways that you can install rockbox. Both are pretty easy. The first is placing the rockbox files on root directory. This method uses the Archos software to load the rockbox. It's a little bit slower booting (approx 12 seconds) but provides a way to test drive rockbox without getting too indepth. Want to remove rockbox? just remove the files and the original software will load. The second way that you can install rockbox is to flash the image. This is a little more in-depth, and in theory a little more risky. But worth it. Once you flash the image the player will boot in about three seconds. woo!
performance
I can't really evaluate how well the Archos software works, because I got rid of it immediately. I am very happy with the Rockbox software. It provides more functionality (text viewer, games, video player, and more stuff). The rechargeable batteries last for about 12 hours of constant use. The cool thing is that once the batteries lose their oomph, you can replace them yourself. (ipods have to be sent in for servicing to replace the battery. Another nice function that I haven't played with yet is that you can use this as a voice recorder, or plug into other audio sources (record players, cd players, etc) and record directly to the Archos unit.
I haven't had anything but fun playing with this. If you buy this, make sure to investigate the rockbox link at the top of the page. I haven't had time to hack together my own set of software, but I will write about it once that happens.
a cautionary note
This note comes from my little sister, as her boy has a jukebox recorder also. Remember that these are little hard drives, with spinning moving parts inside. If you have ever owned a flash card based mp3 player, there aren't moving parts and they can take a fair amount of abuse. Don't drop one of these. Chances are good that you will kill it.
March 25, 2004
Mexirole (Mexican Casserole)
Okay, so everyone probably has some generic, Tex-Mex casserole dish of some sort. They're not fancy (ergo, 'casserole'), but they are tasty. And they hold up well as leftovers.
That's all this is. A record of my gringo-fied, Mexican-esq baked meal. Enjoy, mi amigos.
- 1 medium onion, diced
- 1 lb. ground beef, turkey, or vegan substitute
- 1 pkg taco seasonings
- 2/3 c. water
- 1 (14 oz) can enchilada sauce, divided x3
- 1 (15 oz) can refried beans
- 2 c. shredded Cheddar cheese, divided
- 7 flour tortillas
- cooking spray (like Pam®)
- optional accessories: shredded lettuce, diced tomatoes, sour cream, corn chips, and salsa
- Preheat oven to 350º.
- Sauté onion in a skillet over medium heat. Add ground meat; brown, then drain the grease. Stir in package of seasoning and 2/3 c. water; cook for 5-7 minutes. Set aside.
- Spray a 8x11" baking dish with cooking spray. Pour 1/3 enchilada sauce on the bottom of the pan. Cover with 2 tortillas. Spoon half of the beef mixture over the tortillas, and spoon another third of the sauce over the beef. Place 2 tortillas over this and cover with the refried beans and half the cheese. Cover with remaining 3 tortillas, beef, enchilada sauce, and cheese.
- Bake uncovered for 35 minutes. Let cool for 10 minutes before serving.
March 24, 2004
Spinach Bake
If you read that title and make a face at 'spinach', then go. Leave now. There's nothing for you here. Good riddance!
Are they gone yet?
Okay, for the rest of you smart ones with good taste and fine manners, let me continue... Spinach Bake is an awesome, healthy, over-the-top tasty casserole that defies the old, Popeye stereotypes of this nutritional delight.
Bonez and I are meat eaters, okay? But we crave Spinach Bake at times. It's that good. Served with cheesy garlic toast, it's a no-meat, heavenly meal.
We went to the farmer's market this past weekend and came home with loads of goodness, including tons of fresh spinach. My heart pounded at the thought of Spinach Bake.
Are you ready to become addicted to a leafy, green, veggie dish?
Baked Spinach
Serves 8, but you'll want to keep it all for yourself.
- 1 bag spinach (or about 1 1/4 lb.)
- 1/2 c. diced onion
- 3 cloves garlic, minced
- 3 eggs, beaten
- 1/4 c. all-purpose flour
- 1 c. milk
- 1/2 tsp. salt
- 1/8 tsp. ground black pepper
- 1 c. shredded Cheddar (or Provolone) cheese
- 1/2 c. dried bread crumbs (I prefer herb or Italian)
- 1/4 c. Parmesan cheese
- cooking spray, like Pam®
- Preheat oven to 350º. Spray a 2 quart baking dish with cooking spray.
- Wash spinach thoroughly and remove excess water. Wilt, or steam; and set aside.
- Sauté onion and garlic in a skillet over medium heat. Set aside.
- Wisk eggs, flour and milk together till smooth. Add salt, pepper, and Cheddar cheese; mix well.
- Add onions and garlic to eggs; mix. Stir in spinach.
- Pour in the casserole dish and sprinkle with bread crumbs and Parmesan cheese. Spritz with Pam for a nice, brown top.
- Bake for 50-60 minutes. Test doneness by touching the top; it should be springy, yet firm.
March 22, 2004
Chocolate Chip Cheesecake Dip
If it sounds ridiculously sweet and god-blessedly yummy, that's because it is. It's also simple and a crowd pleaser (if you like that kind of thing).
Personally, I've always kind of shied away from the sweet or desert dips, happy to keep my appetite focused on cheesy queso, savory spinach, and the classic chip&dip/salsa routine. But I've seen the light with this number.
Now don't go expecting me to get all gushy about a fruit/yogurt dip next. I've still got snack time priorities.
Chocolate Chip Cheesecake Dip
I was introduced to this bit o' sin by pameLaLaLa during a Crafturday (Saturday craft day). This sweet concoction provided me with the energy to make sense of all those tiny beads and baubles.
The original recipe makes a lot. Good if you have hungry crafters sucking up all the caffeine and chocolate from your home, quite another thing if it's just a few friends. For you're sake and the sake of your waistline, I'm providing you with the halved recipe.
- 1 c. (1 block) cream cheese, softened
- 1/4 c. whipping cream
- 1/4 tsp. vanilla
- 1/8 c. dark brown sugar
- 1/2 tsp. cinnamon
- 1/2 c. mini chocolate chips
- Cream the cream cheese and whipping cream together.
- Add vanilla; mix. Add brown sugar and cinnamon; mix.
- Fold in chocolate chips.
Serving suggestions: Nilla wafers, graham crackers, angle food cake squares.
March 21, 2004
No-Need-To-Know Chocolate Pie
Smooth, chocolaty, creamy goodness in a cookie crust. Pretty yummy, no?
Yet inside this dessert lurks healthy stuff; and trust me, they really shouldn't know about it. They'll only make a face.
No-Need-To-Know Chocolate Pie
This recipe originally aired on Good Eats, the Tofuworld episode. Now normally, I wouldn't change an Alton Brown thing, but... the original recipe was way too dark and rich. Too much so for our taste buds. So I lessened the chocolate from 2 cups to 1 cup and I like it a bunch more. I'm tempted to try it with other liqueur flavors, like Amaretto or Grand Marnier. We'll see.
- 1 c. chocolate chips
- 1/3 c. coffee liqueur (like Kahlua®)
- 1 block silken, soft tofu
- 1 tsp. vanilla
- 1 Tbl. honey
- 1 prepared chocolate wafer crust (like Oreo®)
- Melt chocolate chips and coffee liqueur in a double boiler. (A small metal bowl resting in a saucepan of simmering water works perfect.) Stir in vanilla.
- Combine the tofu, chocolate mixture, and honey in a blender. Liquefy until smooth.
- Pour the filling into the crust and refrigerate for 2 hours, or until the filling is set.
March 19, 2004
You can park that next to the couch, thank you.
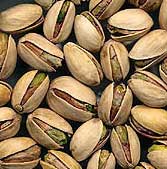
I love pistachios.
This is a fairly new realization. I don't remember having these green gems as a kid, and if given the choice I'd still choose chocolate ice cream over pistachio. But the nutty goodness of these green legumes are, at times, overwhelming.
Just today while having lunch with my dear Bonez, I mentioned that I've missed snacking on pistachios these last few days. (We had recently finished the last of a 4 lb. bag of nuts from Sam's Club.) They're much tastier than the traditional salty snack choices, like chips or munchies ending in "-itos." And they do have health benefits. (Perhaps not in the quantity that I maw down on them.)
Somehow, we started discussing the idea of eating your (my) weight in pistachios. To me, this sounded like a great and rewarding challenge! Would the amount be based on your starting weight, or would it increase much like my thighs, hips and ass? Is there a time limit, or could this be a lifetime achievement sort-of thing?
I will admit that even after filling up on my delish' lunch, the idea of this many pistachio nuts just for me seemed tempting and possible. My mouth just might have been watering... a little.
Then we started discussing the immense quantities of nuts needed to reach this mighty goal. In case you've never seen it, even 4 lbs of pistachio nuts is quite a lot. We could store them in a rented garage, but the birds and squirrels (and people - hey, what are u looking at?!) may be a liability. Just then we passed a lovely, older VW Bug in, what looked like, mint condition and we were temporarily freed from our nut trance. But not for long.
Immediately, the conversation took an odd turn (yeah, it wasn't so odd up till now, right?). Matty thinks that this quantity of pistachio nuts, in the shell, would fit into the VW Bug (including the trunk). I disagreed, but admitted that I was very entertained by this thought. We could use a new Beetle for the discarded shells. How exciting! This, of course, kept us laughing the rest of the way home and then some.
Okay. That's the end of the story. Thanks for listening. Now go home.
Oh, yeah. I stopped by the store tonight and picked up a bag of 'stachios. You know I was gonna!
March 17, 2004
Is maith an t-anlann an t-ocras.

Gaelic for "Hunger is a tasty sauce".
I've got no real idea why I picked this Irish saying above all the other ridiculous ones, perhaps I'm hungry. But it sounded silly enough for today.
Happy St. Pat's to you all!
March 08, 2004
Opportunity
The American Heritage® Dictionary defines opportunity as "A favorable or advantageous circumstance or combination of circumstances." It's a rare opportunity for me to get pix of our other two cats.
Dil is our (plus-size) supermodel; always showing off for company, and making herself and her needs known to all. So it's seldom that we can get a good photo of Marie PussPuss (no, don't ask about the name - it goes on and on from there) and Mrs. Slocombe.

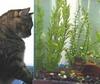
Marie PussPuss *loves* the aquarium and fish, especially right after a cleaning when they're all active and swimming about. She's really the only cat that ever pays any attention to the fish. I wonder why the other two have no interest.
She never causes any trouble for the fish, but occasionally we catch her swiping at the tank in the attempt to catch those allusive toys. (The enigma of the glass will forever be a mystery to her, I'm afraid.)

As for Mrs. Slocombe... Do you see that slightly pissed-off look in her eyes, even while napping in a luscious sunbeam? Yeah, she's always like this. I can be giving Slocombe the most loving adoration and pettings and she'll still look ready to kill. She's very expressive, but there's always that lurking anger in her glance. She's got 'tude, that one.