Hi, this blog has been upgraded, but I'm leaving the old pages online until the search engines catch up. If you want to join the discussion, this may be the page you're looking for on the new site.
Knitting Stix
If you don't have two sticks to rub together to buy two sticks, er... knitting needles, you can simply and affordably make two sticks (respectively). Quite honestly, knitting needles aren't rocket science. Sure, fancier and pricier wood makes for fancier/pricier sticks. But for pure knitting goodness, you can easily make a pair (or five) from craft wood dowels.
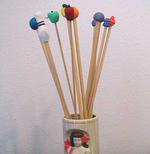
This is an easy afternoon craft, with minimal mess and instant rewards. You can jazz it up a notch by making you're own needle ends from polymer clay, or keep it simple and glue a button or whatnot on the end of your needles.
So have some fun, be creative, and read more.
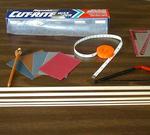
Ingredients for making knitting needles:
- 36" length wood dowel(s) *
- hack saw
- range of sanding paper (I used hobby sanding films, which worked great since they can bend and flex without cracking, and they're reusable)
- wax paper
- measuring tape
- pencil sharpener(s)
* I used a range of dowel sizes to make a variety of needles. Here's how the fractional inches worked out as needle sized after sanding:
- 3/8" = 9mm/US #13
- 5/16" = 8mm/US #11
- 1/4" = 6mm/US #10
- 3/16" = 4½mm/US #7
- 1/8" = 3¼mm/US #3
Please use common sense and normal safety precautions when working sharp objects.
- Measure, mark and cut the dowel(s). I cut mine into 14" lengths, which are the same size as my purchased needles. If desired, I'm sure you could get four dpns (double-pointed needles) from one dowel.
- Using a pencil sharpener, sharpen one end of the cut dowels. I ended up using three different sharpeners for this job. The 1/8" dowels fit into a makeup pencil sharpener (good use for a rarely used item - imho); the three middle range sizes worked well in Bonez's Coke® can sharpener (and it's battery operated, bonus for laziness); and finally, the larger dowels fit into our school-style rotary sharpener (ah, the memories). Actually, all of them would've worked in this last sharpener, but it was lost to me until Matty came home and could retrieve it from who-the-hell-knows-where.
- Starting with a coarse sandpaper, sand all of the dowel length, but focus on the pointed end. You want to round this point down so it won't hurt when you knit. Your sanding motion should follow the length as well as around the circumference of the dowels,
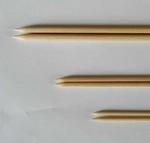 being careful not to make a lopsided needle.
 - Move on to the next, medium-coarse paper; sanding the dowels well. Continue using less-coarse grades of paper until the fine grit. You could probably do it justice with three varying grits, but I used four from my pack of five. Once you reach the fine sanding paper, the needles should be smooth and you shouldn't be able to feel any flaws in the wood.
- Tear off a piece of wax paper and rub down the needles, much like the sanding motions. As the wax paper heats up with the friction, the wax will transfer onto the wood. (Pretty kewl, huh?) You can use both sides of the wax paper - don't mind the wrinkles and don't stab your hand.
 You can also use this trick to finesse up older wooden needles that could use a bit of smoothing.

My biggest hint while making these wondrous inventions? Careful who you let watch you make them! The motion of both sanding and waxing is reminiscent of, well... I just recommend that you do this in the privacy of your own home.
# # #

