February 22, 2005
Getting your vitamin cake
As promised, I've got a tasty recipe for my vegetarian/vegan friends. In fact, it was taste-tested by these same friends and it passed muster. So I'm proud to share with you my recipe for vegan cupcakes.
First, let me explain that although tasty and good, these have less of a cake texture and more of a soft, sugar-cookie like quality combined with a rice flour cake composition. (What, you mean to say you've never eaten at VietNam [the restaurant]?)
Vegan Vanilla CupCakes
- 5 Tbl. margarine, softened
- 5 Tbl. canola oil (or other light, veg. oil)
- 2 c. sugar
- 3 c. cake flour (or 2 3/4 c. white flour)
- 1 tsp. salt
- 1 tsp. baking soda
- 2 c. water
- 2 tsp. vanilla
- 2 tsp. white vinegar
Preheat the oven to 350°. Line cupcake pan with cupcake papers, or coat with cooking spray.
Combine the margarine, oil, and sugar in a mixer, and mix until well blended.
In a separate bowl, mix the flour, salt, and baking soda. Combine the water, vanilla, and vinegar in a different container. Begin blending into the sugar mixture by alternating the dry and wet ingredients.
Bake for 35 minutes at 350° (or for 11 min. if mini-cupcakes). Test for doneness by inserting a toothpick and have it come out clean. Makes 24 full or approx. 72 mini cupcakes. These cupcakes do not rise much.
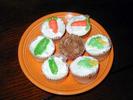
Frost as desired. Me? Well, I couldn't resist the corny, obvious decorations of frosting them to look like veggies: ears of corn, carrots, and peas. (I was late in taking pix, so the icing color has started to bleed on the leftovers. Sorry.) I also made some with chocolate icing. This was also fun for getting a feel (again) for cake decorating.
February 19, 2005
Tasty Beef
Here at TAGF, we know that some toys are indeed 'good food', but that others aren't meant to be eaten or totally missed the flavor bus. But man can't live on toys alone. So today, I post about food.
Oh sure, I've done this before: offer up tasty vittles that make you salivate all over your keyboard. Well get a bib already, 'cause I'm at it again.
I needed a good meal to feed my man on Valentine's Day and didn't hit the store until mid-afternoon. (Which means that the slow cooker was out.) And we were out of propane, so grilled steaks was off the menu. (Funny - since watching King of the Hill I can't say 'propane' without Hank's voice in my head. "Propane and propane accessories." he he) While looking around the meat dept., I decided to grab a good lookin' roast and figure it out once I got home. The rest is tasty, meat history.
Simple Beef Roast
Sorry my vegan friends, but I'll hook y'all up next time. 'K?
- 2 lb. boneless chuck roast
- 2 Tbl. olive oil
- 1 1/2 c. Burgundy wine, divided
- salt & pepper
- 2 medium onions, sliced
- 3 cloves garlic, chopped
- 2 bay leaves
Turn the oven to 325°.
Heat the olive oil and 1/2 c. of wine over medium-high heat. Sear the roast for 4 minutes each side. (I recommend using a pair of long grilling tongs to hold the roast up on its sides to prevent it from toppling over.)
Remove the roast and turn off the burner. Sprinkle salt and pepper on the roast. If desired, make a few small cuts into the roast and insert slivers of garlic.
Add the onions, bay leaves, and garlic to the bottom of the pan. Place the roast on top, and pour 1 c. of wine over the roast.
Cover and place in oven. Cook for 30 minutes.
Reduce heat to 300°, and cook for 45 minutes.
Be prepared for the delicious aromas in your kitchen and the praise from your diners. Serve with garlic couscous and a crisp salad for a great meal. Enjoy.
February 18, 2005
High Society
More hats. Well, one more. For my MIL, Sue.
Let me preface this by stating that she picked out the colors; apparently it's a society thing. And I thought that it would burn my retinas to knit it, but it wasn't so bad. In fact, it was kind of nice and fun.
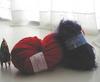 a muted pic of the yarn
While we were in Frankenmuth this past Christmas, Sue-mom helped me pick out the yarns to make her a hat. Yummy Lorna's Laces Shepherd Worsted (superwash wool) in Bold Red and Berroco Zoom in purple. Next I needed the perfect hat pattern. I couldn't do any better than the one and only Bonne Marie's Bucket Hat.
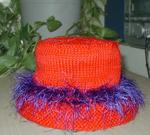 stylin'!
This pattern was fun and easy - (bucket) hats off to Mme. Burns. I knit the smallest size because I was told that Sue-mom has a tiny, wee head. (Boy, I sure hope so 'cuz this sucker is teeny.)
I followed the pattern exactly, but adding the eyelash yarn just before the brim ended/after going to one strand of yarn. I continued carrying the eyelash with the wool for four rows after the last purl row. And IMHO, I think it turned out wonderful. So much so, that I may have to make one for me (in not so eye-catching colors).
February 14, 2005
Heya, cupcake!
There's been a resurgence of cupcake love lately. (Or perhaps I'm slow on the times?) There are bakeries that specialize in cupcakes (none here - phooey), websites devoted to these wee lil' cakes, and folks clamoring for a cake of their own. Even the NY Times. (It's worth it to watch, listen, and salivate.) And I just went with the flow.
On this day of commercialism, I put a little bit of homemade sweetness back into the holiday. A recent discussion between gal-pals, and I decided to bake from-scratch, chocolate cupcakes. I found the recipe in The best of better baking cookbook and now have a great, new site to reference, ta' boot.
I made mini 'Cola Cupcakes' with 'Master Brownie Frosting' from the book. But to add my own spin, I took the traditional Valentine box-of-chocolates idea and filled some with tasty morsels. Carmel, cherries, and cream - yum! I wanted to frost the mini-cakes in a similar manner, but that just didn't work out. So they weren't the purtiest, but they are tasty indeed.
I believe I like baking cupcakes. I believe that I will shower my friends with 'cakes on many occasions. Watch out - I may have a cupcake for you!
Cola Cupcakes
from the best of betterbaking.com
- 1 3/4 c. all-purpose flour
- 2 c. sugar
- 3.4 c. unsweetended cocoa powder
- 1 tsp baking soda
- 2 tsp baking powder
- 1/8 tsp salt
- 1 tsp vanilla extract
- 2 eggs
- 1/2 c. vegetable oil
- 1 c. flat cola
- 1 c. warm brewed coffee (or buttermilk)
- Preheat oven to 350°. Line cupcake pan with paper liners.
- In a large mixing bowl, combine all the dry ingredients and whisk to blend.
- Whisk in the wet ingredients (vanilla through coffee) until smooth. This is a thin batter.
- Pour into the prepared pan(s), filling them 3/4 full. Bake for 25 - 30 minutes (10 minutes, if mini cupcakes), or until the cupcakes are slightly puffed in the center and spring back when gently touched.
- Cool in the pan for 10 - 15 mintues, then unmold onto wire racks and let them cool completely before frosting.
February 13, 2005
Weezer had it easy
How easy Weezer makes it sound. Simply hold the thread as he walks away. Easy-peasy, no? No. It is not that easy to destroy a sweater. (And was he wearing a large, one-piece sweater and nothing else? Unravel the one garment and he's naked on the floor? Phppt.)
But it's not too difficult, either. Cut a few seam threads, tug here, tug there, and finally - you have a pile of something that was previously something whole. Yay.
Warning: This article is pic-laden, and may take a while on slow systems. Upgrade to DSL alreay. You have been forewarned.
Thanks to Alison for getting this party going and putting the ideas in my head. (Yes, I'm that easy to manipulate.) I'm all about the February Fix, but... nothing's broken. Or, more accurately, I've not knit anything for myself but one sweater, which I lurve. So if I can't rip out my stuff, I'll do the next best thing (or possibly the better thing): I'll thrift a sweater and rip it out!
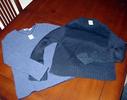 I got my Blue's Clues
And, dah-lings, that's precisely what I done. Thanks to the Denton thrift, I was able to pick up two inexpensive sweaters in good shape that I can happily destroy. Note to other Texans: it is rare and a treasure to find actual wool sweaters at thrift stores, but it is possible.
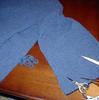
The first is this 100% wool sweater (I believe it was Old Navy, but forgot to take pics of the label). I liked the heather-y blues and thought I might make Matty a pair of Fuzzy Feet. And for $3.49 it wasn't a bad deal.
The other sweater is a dark navy, 100% silk sweater for $.99. Yep, 99¢. Nine dimes and nine pennies. Less than one dollar US. And the silk yarn is in wonderful condition. But I can see why this got thrifted. The weight and drape of the yarn just doesn't work for this sweater, plus having to dry clean a sweater? Blah. I have great plans for this yarn; perhaps this.
 such a wee bit o' thread
But this story is about rip #1: the blue wool. I followed all the great directions, and was easily able to rip out the sleeve and side seam thread. (And how great was it that one thread held both the sleeve AND the side seam? One.)
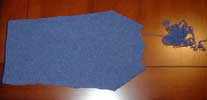 Going...
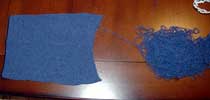 going...
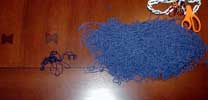 gone.
gone.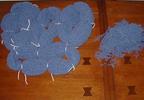 waste to the right
The sleeves ripped pretty easily and I had v. little waste from it, just a bit on the shoulder seam, where there was some machine seaming. Instead of fiddling with the machine-made seams, I simply cut them out and didn't look back. Even on the neck and shoulders. I didn't want to waste the time or patience it would take to undo it all; besides, the waste was still minimal compared to the rewards I reaped.
I forgot to take the "bath" picture, but here are the other shots: spinning into a hank straight from the sweater (another benfit of the swift), hanging out to dry, and winding into balls.
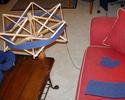 ripping and winding
 psycho pshower pscene
 glory bit of sunshine
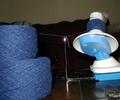 'balling' is much different that 'bawling'
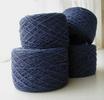 Ah, the rewards!
I do admit that I was surprised at how fine a yarn this was. Oh-my! How could I have picked fingerling weight yarn as my first ripping project?! Arghh. But I did. Now I move on. This may mean, however, that it won't become Fuzzy Feet for da' Bonez, unless I hold 3 or 4 strands together while I knit. Instead, I'm considering a lacy shawl/wrap. What do y'all think?
February 10, 2005
Ugg
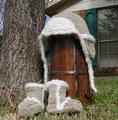 aren't dey cute
There are multiple meanings for "Ugg" and I'm referring to most of them. Don't get me wrong, the overall results are these v. adorable hat and booties for my nephew Benny. But getting them done, that was... well, ugg.
The pattern for the Ugg hat and booties is from Knitty Gritty, a self-proclaimed 'hip' knitting show on the DIY network. Now I don't get the DIY network and I've never seen this show. But my sources tell me that it's for crap. They don't relate to the hostess or her "knitsta's" on the couch. (Good idea, bad results. Maybe next time.)
My opinion of the program is based on this one set of patterns. And it's crap.
No, I don't need someone to virtually or otherwise hold my hand while I'm knitting to make certain that I do it right. But if it's your pattern and you know what works and what doesn't, shouldn't you share that information with the rest of us? The brunt of the patterns were fine. They could use some improvement in the instructions, like a stitch count during decreases. But the worst of it was the finishing directions.
The booties weren't too difficult. No, they weren't easy or direct; more of a vague "do this" statement. I could figure it out without too much fuss. But the hat pattern? WTF (Why-TF, in this case) is the pattern split into two? Wouldn't it make more sense for anyone printing the pattern that it would be one, continuous document? And the finishing text for the hat: impossibly unclear. In fact, the whole composition of the hat is lame.
But I trucked through it because I love my nephew and he'd look adorable in the set. (Yes, R, that's a plea for pix once you get them. Of all the hats & heads, not just Benny-bean's.) So my advice to anyone considering this set? Go with the booties, but buy a hat. Or heck, most babies don't like wearing hats, right? Really, the booties contain the max cuteness factor anyways.
February 09, 2005
Gung Hay Fat Choy!

Happy 4703! Happy Chinese New Year!
There are a few reasons why I like this new year's holiday better than the western version (Jan. 1). For one thing, the focus of the holiday seems based on nicer traditions. Sure I still drink and have fun, but I don't usually drink-drink to get drunk-drunk crazy. And that seems to be expected or the norm for New Year's Eve. Also, I think that there are too many holidays crammed into a small amount of time as it is. Relax a little, take a breather... better? Good, now celebrate again. See, ain't that nice?
Of course, then there's the fact that I like food. And I like Chinese food. (Although a fairly recent event that occurred only in my adult years.) Besides champagne, I can't recall any tasty traditional foods that are savored on New Year's Eve. Oh sure - corned beef and cabbage or black-eyed peas are some traditional foods for New Year Day. But those aren't really tasty treats in our house. So give me Chinese New Year and a fork (or chopsticks), I'm ready!
Matty and I have had trouble in the past finding any restaurants that celebrate or have festivities for this event. So this year, we decided to just run a few errands and then dine at where ever looked good. But we lucked out. We stopped at the May Dragon, where we used to lunch when we both worked in that area. Oh, joy! They are totally celebrating Chinese New Year. And with the help of a local Tai Kwan Do center, the Lion Dance is performed. (Yeah, Shannen, we thought of you. And laughed.)
So if you haven't celebrated yet and want an entertaining floor show along with dinner (but not in a dinner-and-theatre sort of way), swing by the May Dragon. I believe that the celebration and dancers continue on for a few more nights this week. (The Lion Dance is performed at 7:30 pm for one hour each night of the celebration.)
Go. Enjoy. Eat. And have a good New Year.
February 05, 2005
Wedding Pez
After a few years of languishing half-completed, I finally finished the article on my little sister's wedding PEZ. Even if you read this on the old site, there's some new stuff too, so I don't feel at all bad about rehashing this entry on the front page. So, come on in, relax, reread your favorite parts, and be awed at the new information!
...or something...
Update -- May 13, 2007
I've received several requests for this, so, here is the Heart Pez template that I used when creating the decals for my sister's PEZ. The zip file contains the graphic in both .EPS and .AI format (should work in Illustrator 8 and up.)
All the standard rules of downloading something from the Internet apply. This worked for me, it may not work for you. If the file somehow breaks your computer or ruins your life, I might feel bad, but I'm not responsible. If you're worried about such things, please check the file with a virus scanner before unzippin' it.
Back to the article...
Creating Custom PEZ in 9 E-Z Steps
 pez is good food
When Rachel (my little sister) and Jason said that they were going to get married, I immediately thought, PEZ. (If you don't know what Pez are: #1: Shame on you; and #2: They are a little candy dispenser.) I had this picture in my mind of the Valentine's heart pez with their names on it.
Then I had to make it happen.
 Step 1
Step 1: Get a ton of Valentine's dispensers. The best time to do this is around Valentine's Day. Don't be worried by the looks that you get by the clerk at Michael's Craft Store. Don't be worried when you get home with bags that look like this:
 Step 2
Step 2: Open the Pez. This is no ordinary job. It is only for the brave. So, of course, Nancy took care of this.
By this time, I had come up with an idea. I remembered putting decals on models when I was younger, and I thought, "boy they should really make decal paper that you can print on." So I did a google search for "decal paper printer" and there it was. I ordered from a place called Bel Inc.
Step 3: Soon the decal paper arrived in the mail. Before it arrived, I was busy. First, I needed to create a template design. The printed area on the Pez is a little curvy.
 Step 3
I felt the best way to get the curves right was to scan the PEZ.
 Step 4
Step 4: Then came the design. I relied on my trusty copy of Illustrator to get me through the hurtle. Ever the documenter, I took a picture to preserve the moment.
 Step 5
Step 5: Printing the decals was next. I thought this was going to be relatively easy, but after they were printed, I had to coat them with several coats of Krylon Acrylic. This would make them waterproof. The instructions that came with the paper said that it would take 2-4 light coats. They really mean five heavy coats. Here are the decals drying.
Step 6: Next came the fun part. Defacing the Pez. You see, the Pez all had "Happy Valentine's Day" written on them. I needed a blank place to put the decal. I love Pez, and I don't recommend abusing them, but these Pez had a higher purpose. I tried several different methods before I settled on...
Lighter fluid. This stuff is amazing! See it in action below.
 Step 6
See how quickly it removes the printing? Here is another photo mere seconds later. (Only three easy payments of $19.95, and if you call in the next 20 minutes, we'll get rid of one payment!... oh, nevermind.)
 Step 7
Step 7: The next step is to lay the Pez out like a little tiny army. This is very important as it makes you feel all powerful.
 Step 8
Step 8: The definite worst part was cutting out the decals. This took steady hands and nerves of steel. I cut the one in the picture as a photo-op, but Nancy cut up most of them.
Free Tip: Use the sharpest scissors that you have in your house (unless they're Nanc's sewing scissors). Seriously, the sharper the edge, the less problems you will have with your decals later in the process. The reason is that you want as much of that thick coat of Krylon that you sprayed on to stay attached.
 Step 9
Step 9: Then you have to take the decals, dip them in water 'til the backing starts to come off, and attach them to the Pez. (The instructions that came with the decals say to soak for a minute, but I found that 15-20 seconds worked best for me.) Then, repeat. Stop before you look like this. (Note the small, plastic fan that is saving me from inhaling deadly chemicals. Hmm.. the fan looks pretty small. If you try this, I would suggest a larger fan.)
 ta -da!
Once they are dry, you can admire your amazing talent. The decal actually looks very good.
Update:
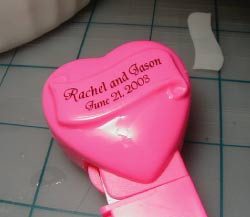 close up
This is a post script that I wrote about two months after we were finished. I needed to add a couple of additional details that might make it easier if you are trying to do this, too. Below is a close-up of the PEZ right after I put a decal on. Even up close, this looks pretty good. It will only look as good as your printer can print, though. If you are printing the decals at home, make sure that you've cleaned your printer, and print a couple of test pages before printing on the decal paper. If you have a nicer printer at work, use it! Just make sure that you get the right kind of paper for the printer that you will be using (inkjet or laser).
After you have the decals attached, let them dry for a day or so. Don't try to soak up all the water immediately, or you may ruin the decal. The water will evaporate off and leave a great looking image. If you let the newly-decorated PEZ sit around for more than a week (without sealing them), the glue will start to degrade, and the decals will start to pull up around the edges. This issue is exacerbated if you use dull scissors to cut the decals out.
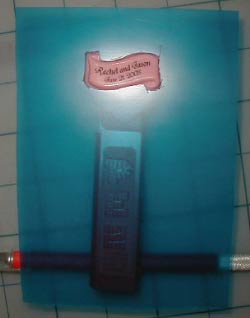 spray template
To permanently affix the decal, you will need to spray 1-2 additional coats of Krylon onto the decal. I created a template to protect the PEZ, so that I only sprayed the decal. I used some thin plastic sheets from a craft store that are used to make stencils.
Free tip: If you are going to be spraying a ton of these, go to your local drugstore and buy a package of medical latex gloves. It will cost about six dollars for 100, and you won't have to scrub the Krylon off of your hands every night.
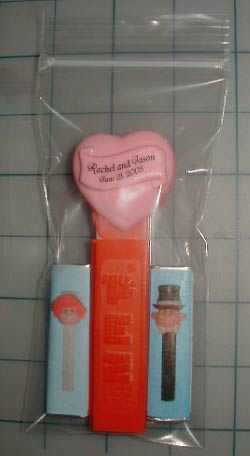 all finished and pretty
For packaging purposes, I bought a bunch of PEZ-sized ziplock bags from sjglew.com. I also made special candy packs. The PEZ were a big hit, and it was pretty cool to be in a room and hear so many dispensers clicking at once.
In retrospect, it was a lot more work that I had expected. Nanc and I ended up making 125 completed wedding favors. Was it worth it? Yeah...it was.
(Best wishes for your marriage, Bird and Bear!!)
If you're working on a similar project, and have any questions about anything that I've written, let me know.
February 03, 2005
I am a wuss
There are all sorts of injuries you can obtain while knitting. Typically, these fall into two main categories: boring but serious, or comical yet painful.
In the 'boring but serious' group you have the common ailment of knitting for too long until you have worn out/pulled a muscle in your hand/arm/shoulder/back. This requires time away from knitting to rest and repair the damage. Also, carpal tunnel is a biggie here. Not fun. Hurts like heck. But boring none-the-less.
Occasionally a fiasco happens while knitting which, after the injury and ego have healed sufficiently, is quite funny. Sitting on the pointing end of a needle or a yarn stash avalanche are two examples of this type of injury.
But those kinds of knitting mishaps are acceptable in this crafty world. Silly sometimes, but still allowable. Me? What makes me a sad little injured wuss? I have a bruise on the tip of my index finger from pushing yarn and stitches around my needles. Oh, how sad.
Of course, it's not noticeable so I can't garnish sympathy from friends or hubby. They see no boo-boo. It's like I'm cryin' over spilled Noro. And do you know how many things you do with the tip of your index finger? LOTS. Nearly everything. And it hurts every single time. Even typing this friggin' article hurts! (Hmmm, I wonder if I could avoid using the F, V, B, G, T, and R keys?)
So I am pansy. A wuss. I feel like I should be taunted in the halls. Young children should chase me and throw point protectors at me. I will run away and hide in the woods where I will have to learn latch hook to stay alive. Woe is me.